Understanding the Picture-in-Picture web API with examples
JavaScript Web APIs provide many helpful features. The picture-in-Picture feature is one you should know to use and control videos in better ways.
Picture-in-Picture is a feature supported by some smart televisions, devices to show the content(like videos) on a floating window(on the top of other windows) so that users can continue to see the content while interacting with the background page, other sites.
Have you noticed the mini-player option when you watch a video on Youtube? You can watch the video in the Picture-in-Picture-like mode while interacting with the other part of the application.
Figure 1: Example of a Youtube video playing in the mini-player
The Google Chrome browser started supporting the Picture-in-Picture mode. You can use this extension to enable it in the chrome browser. Once enabled, you can see it appearing beside the browser's address bar.
Figure 2: Picture-In-Picture extension for Chrome browser
For Mozilla Firefox, you may have to enable it from the about.config page by setting the media.videocontrols.picture-in-picture.enabled property to true
Figure 3: Enable picture-in-picture in the firefox browser.
Picture-in-Picture using JavaScript
JavaScript provides you the Picture-in-Picture API to create and control the feature programmatically. Here goes the browser support information:
- Google Chrome version >= 70
- Microsoft Edge version >= 79
- Safari version >= 13.1
- Mozilla Firefox: Partial(Conditional) Support
You can find the other browser and device support details from here.
The picture-in-picture API methods are available in the HTMLVideoElement(<video>) and Document interfaces to allow users to toggle between the standard presentation and picture-in-picture modes.
Check Browser's Support
We can check the browser's support for this API using the following code,
if (document.pictureInPictureEnabled) {
  // The picture-in-picture feature is supported
} else {
  // Ther is no Support for the picture-in-picture feature
}
Picture-in-Picture Mode: Enter and Exit
To enter into the picture-in-picture mode, you can call the method requestPictureInPicture() on the <video> element. When you call the method exitPictureInPicture() on the document object, the video exits from the picture-in-picture mode and enter the standard presentation mode.
Let's add a simple video element in the HTML file,
<video
   src="path_to_video_file"
   id="video" muted autoplay loop>
</video>
Next, we will add a button to toggle between the modes. Then, finally, add a click handler to call the toggle() function.
<button
   id="actionBtnId"
   class="action"
   onclick="toggle()"
   disabled>
     Enter Picture-in-Picture mode
</button>
In the JavaScript, we will define the toggle() function as,
function toggle() {
  if (document.pictureInPictureElement) {
      document.exitPictureInPicture();
  } else if (document.pictureInPictureEnabled) {
      video.requestPictureInPicture();
  }
}
In the code above, we check if the picture-in-picture feature is enabled. If so, call the requestPictureInPicture on the video element to get into the picture-in-picture mode. Once the picture-in-picture mode is enabled, the document object will have the pictureInPictureElement. So, when the toggle function gets called next time, it checks the pictureInPictureElement. If found, it exits from the picture-in-picture mode.
Here is a CodePen to see it as an example. Try clicking on the button below the video and see the video getting into the picture-in-picture mode. Click on the same button again to exit from the mode.
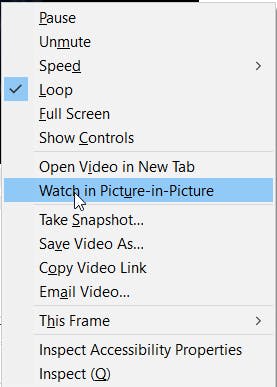
Please note: As explained before, to see the picture-picture feature working in the Mozilla Firefox browser, you have to enable it first. Once enabled, you can right-click on the video and select the option
Watch in Picture-in-Picture.
Picture-in-Picture API Events
The Picture-in-Picture API defines three events.
enterpictureinpicture: Triggers when a video element enters the picture-in-picture mode.leavepictureinpicture: Triggers when the video element exits the picture-in-picture mode.resize: Triggers when the picture-in-picture windows resize.
These events can come in handy when you want to perform any custom actions based on a video enters or exit the picture-in-picture mode. Here is an example of changing a button text and color when a video toggles between the modes.
video.addEventListener('enterpictureinpicture', () => {
  actionBtnId.textContent = 'Exit Picture-in-Picture mode';
  actionBtnId.classList.add("redBtn");
});

video.addEventListener('leavepictureinpicture', () => {
  actionBtnId.textContent = 'Enter Picture-in-Picture mode';
  actionBtnId.classList.remove("redBtn");
});
You must have noticed it working in the code pen example we have seen above.
Picture-in-Picture API Properties
The Picture-in-Picture API provides properties in multiple JavaScript interfaces like, HTMLVideoElement(<video>), Document, and ShadowRoot.
pictureInPictureEnabled: We have seen this property already. It tells us whether or not it is possible to engage in picture-in-picture mode.if (document.pictureInPictureEnabled) { video.requestPictureInPicture(); }autoPictureInPicture: It is a video element property that automatically enables a video to get into the picture-in-picture mode and exits when the user switches the tab/application. For example, right-click on the video in the CodePen below and enter into the picture-in-picture mode. Then switch tabs and come back to the same pen to see it exiting automatically.disablePictureInPicture: This video element property will disable the picture-in-picture feature. Here is a CodePen to try out this property.
How to Control Styling?
The CSS pseudo-class :picture-in-picture allows us to adjust the size, style, or layout of content when a video switches back and forth between picture-in-picture and standard modes.
:picture-in-picture {
  box-shadow: 0 0 0 5px #0081ff;
  background-color: #565652;
}
Stream Webcam Capture into the Picture-in-Picture mode
Let us do something a bit more fun now. How about capturing the video using your webcam and show it in the picture-in-picture mode.
First create a video element,
<video id="videostreamId" autoplay="" controls></video>
Now we can start the webcam, and once we start receiving the stream, we can pass it to the video element to play it.
 await navigator.mediaDevices.getUserMedia({ video: true })
 .then(stream => {
    window.localStream = stream;
    video.srcObject = stream;
    video.play();
  });
Next, we use the Picture-in-Picture API method when the video is fully loaded into the video element.
 video.addEventListener('loadedmetadata', () => {
    video.requestPictureInPicture();
  });
You can try out the same in the CodePen below.
Please note: You may have to open the pen in a new tab and see the webcam working. Also, feel free to fork and fix a bug I left unfixed in the code 🐞.
That's all for now. If you enjoyed this article or found it helpful, let's connect. You can find me on Twitter(@tapasadhikary) sharing thoughts, tips, and code practices. Please hit the Subscribe button at the top of the page to get an email notification on my latest posts.
You may also like,

