
Understanding Dynamic imports, Lazy and Suspense using React Hooks

An exciting journey
It has been an exciting journey so far with the #2articles1week challenge from HashNode. So much of learning from reading the great articles coming out of it. I believe, all the writers taking part in it, are the Real Winners.
I am proudly at the 4th week(last week) of the challenge and here goes my 9th article as part of it. Hope you enjoy reading it.
What are we going to learn today?
If you are new to the web development, you are probably learning about the code modularity, components, bundling etc. If you are a veteran, you are mostly doing it already. These are few key aspects we should learn and reflect on, irrespective of the library or framework we use for web development.
In this article, I am going to explain the advantages of knowing few techniques from react to do better with,
- Code Bundling and Splitting.
- Loading the code dynamically on demand(a-la-carte vs platter meal).
- Gain on application performance, first load etc.
- Build the flexibility of plug and play.
We are going to learn about, Dynamic import of react components, usage of React.Lazy and Suspense. You really do not need any prior experiences to follow this article. However having very basic understanding of react will be an advantage.
Shape, Color and Size
Let us build an app to get us some shapes, colors and sizes on button clicks. Here is a screen-shot that shows the three different states of the app when the respective buttons are clicked.
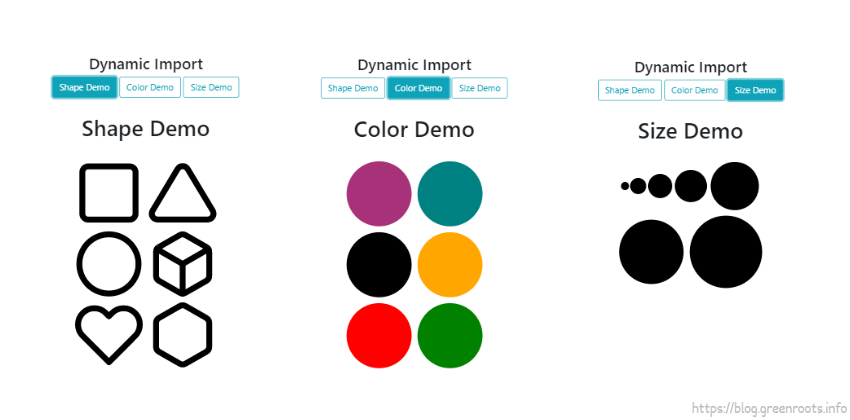
Do you want to play with the app now? Not a problem.
- Demo: It is running on Netlify.
- Github: Source Code can be found here.
The components
Let me introduce three simple components here, ShapeDemo, ColorDemo and SizeDemo shows some random shapes, colors and sizes respectively. I am using Feather icons to create them.
ShapeDemo Component
import React from 'react';
import { Square, Triangle, Circle, Box, Heart, Hexagon } from 'react-feather';

const ShapeDemo = () => {
    return(
        <>
            <h1>Shape Demo</h1>
            <div className="demo">
                <Square color="black" size={128} /> { ' '}
                <Triangle color="black" size={128} /> { ' '}
                <Circle color="black" size={128} /> { ' '}
                <Box color="black" size={128} /> { ' '}
                <Heart color="black" size={128} /> { ' '}
                <Hexagon color="black" size={128} /> { ' '}
            </div>
        </>
    )
};

export default ShapeDemo;
ColorDemo Component
import React from 'react';
import { Circle } from 'react-feather';

const ColorDemo = () => {
    const colorMap = ['#A63578', 'teal', '#000000', 'orange', 'red',
        'green', 'blue', 'purple', 'yellow'];
    return(
        <>
            <h1>Color Demo</h1>
            <div className="demo">
                {
                    colorMap.map((color, index) => (
                        <Circle
                              color={color}
                              fill={color}
                              key={index}
                              size={128} />
                    ))
                }
            </div>
        </>
    )
};

export default ColorDemo;
SizeDemo Component
import React from 'react';
import { Circle } from 'react-feather';

const SizeDemo = () => {
    const sizeMap = ['16', '32', '48', '64', '96', '128', '144'];

    return(
        <>
            <h1>Size Demo</h1>
            <div className="demo">
                {
                    sizeMap.map((size, index) => (
                        <Circle
                              color="black"
                              fill="black"
                              key={index}
                              size={size} />
                    ))
                }
            </div>
        </>
    )
};

export default SizeDemo;
These are simple react components that we are going to import and render with the respective button clicks.
Explicit Import and Eager Loading
One certain way we can go about it is, we import all the three components into the main component(say, App) and achieve the aimed functionalities.
- First the imports
import ShapeDemo from './demo/shape-demo'; import ColorDemo from './demo/color-demo'; import SizeDemo from './demo/size-demo'; - Manage a state to show respective demo type.
const [demo, setDemo] = useState(); - Lay out the buttons
 <Button onClick={() => selectDemo('shape')}>Shape Demo</Button>
 <Button onClick={() => selectDemo('color')}>Color Demo</Button>
 <Button onClick={() => selectDemo('size')}>Size Demo</Button>
const selectDemo = type => { setDemo(type); } - Finally, render the components based on the selected types
 <div className="demo-ground">
      { demo === 'shape' && <ShapeDemo /> }
      { demo === 'color' && <ColorDemo /> }
      { demo === 'size' && <SizeDemo /> }
 </div>
This approach works well and we get the desired outcome. So, where is the problem?
Here are the problems:
What if, I want add two more demos to it, i.e,
VolumeDemoandMeasuringDemo? We have to change the code in App.js file to import both the components. Also we need to have couple more conditions in render like,{ demo === 'volume' && <VolumeDemo /> } { demo === 'measuring' && <MeasuringDemo /> }This is not so cool. To keep this code so open for change for every requirement addition is not smart enough.
We are importing all these demo components explicitly as in we are loading them
eagerlyall at once.Eager loading loads one or more resources as soon as the code is executed. It also involves pre-loading of related entities(components) referenced by a resource.
Now wait, this is more problematic. More the app code grows, the bundle grows and that means, the initial loading time of the app will grow proportionally. Can't I just load the code needed in the beginning and load the rest on demand? Yes, that's where the Dynamic Import and Lazy Loading comes into picture. We will discuss that in a while.
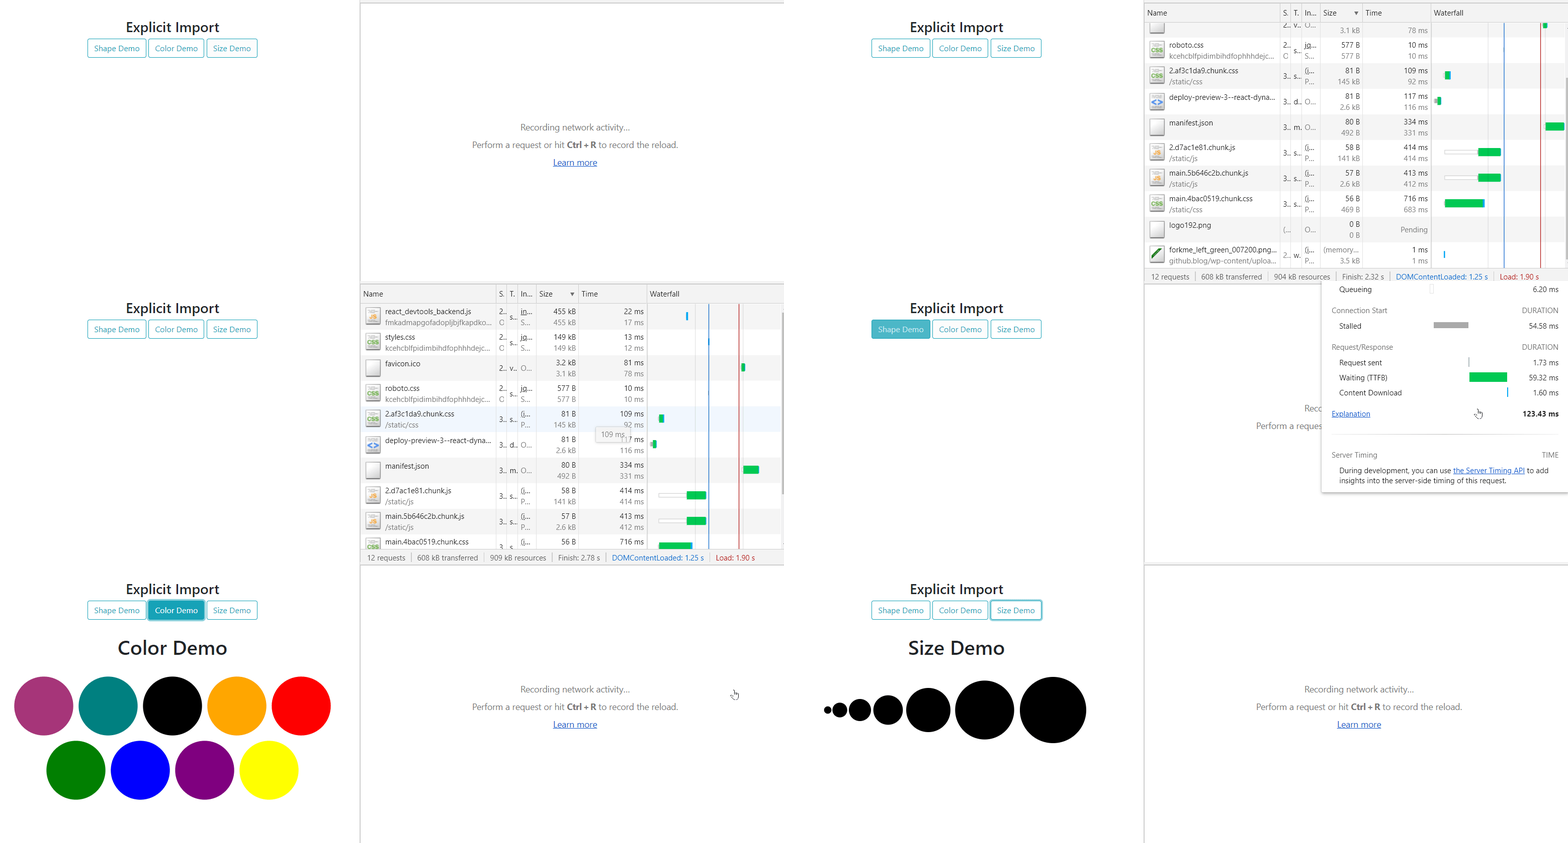
Here is a quick demonstration that, with eager loading we do not load anything on demand. Observe that, since all loaded(resource fetched) at the first load of the app, each of the button clicks do not load anything. No on demand loading(or fetching of the resources).
Dynamic Import and Lazy Loading
As we have seen the problem with explicit import and eager loading, we need something to help us with the bundle size and initial load to a limit. React introduces the concept of Code Splitting which can help us in splitting the bundle generated by the tools like Webpack, Rollup etc.
Here is a quote from react doc on code splitting:
Code-splitting your app can help you “lazy-load” just the things that are currently needed by the user, which can dramatically improve the performance of your app. While you haven’t reduced the overall amount of code in your app, you’ve avoided loading code that the user may never need, and reduced the amount of code needed during the initial load.
Now we will be changing the code of our app such that, we can take advantages of this concept fully.
Dynamic imports and React.Lazy
In this version of the app, we will be fetching the demo component information from a store(say, json file, a db table etc) and import them dynamically. Here is a simple json file that, describes the meta data information like, component id, display name and the file name(or the component name).
{
    "data": [
        {
            "id": "shape",
            "name": "Shape Demo",
            "file": "shape-demo"
        },
        {
            "id": "color",
            "name": "Color Demo",
            "file": "color-demo"
        },
        {
            "id": "size",
            "name": "Size Demo",
            "file": "size-demo"
    ]
}
We will remove all the explicit imports done before,

Add the code for dynamic imports,
const importDemo = file =>
  lazy(() =>
    import(`./demo/${file}`)
      .catch(() => console.log('Error in importing'))
);
Few things are going on here,
- We have a function called,
importDemowhich takes a file as an argument. This file argument represents the selected demo based on the button clicked. - Next the
lazy(or React.lazy) function lets us render a dynamic import as a regular component. As you see, we are now importing the component placed under the demo folder dynamically.
React.lazytakes a function that must call adynamic import(). This must return a Promise which resolves to a module with a default export containing a React component.
So Before:
import ShapeDemo from './demo/shape-demo';
After:
const ShapeDemo = React.lazy(() => import('./ShapeDemo'));
This will automatically load the bundle containing the ShapeDemo when this component is first rendered.
Handling the button clicks
Remember the demo meta data json? It has all the details of the demo components? We have imported it as,
import * as meta from './meta/demo-data.json';
The buttons can be setup by iterating through the meta information,
mataDemoData.map((demoData, index) => (
     <React.Fragment key = {index}>
          <Button
              variant="outline-info"
              onClick={() => selectDemo(demoData.file)}>{demoData.name}
          </Button> {' '}
    </React.Fragment>
     ))
The selectDemo() function filters out the other demo and select the one based on the respective button click,
const selectDemo = file => {
    const filtered = mataDemoData.filter(elem => {
      return elem.file === file;
    });
    loadDemo(filtered);
}
The loadDemo() method does the trick by invoking importDemo() method(one that uses lazy for dynamic import) we explained above.
async function loadDemo(filtered) {
    const promise =
      filtered.map(async demo => {
        const Demo = await importDemo(demo.file);
        return <Demo key={demo.id} />;
      });

    Promise.all(promise).then(setSelectedDemo);
  }
Did you notice that? We now import the demo dynamically and we do not care to change this code a bit if there is a new demo requirement added in future.
Suspense
Alright, so we are good with the dynamic imports and the lazy loading so far. How about rendering it? Let us welcome, Suspense. A lazy component can be rendered inside a Suspense component. It allows us to show some fallback content (such as a loading indicator) while we’re waiting for the lazy component to load.
<div className="demo-ground">
  <React.Suspense fallback='Loading demo, hang on...'>
     {selectedDemo}
  </React.Suspense>
</div>
With that, we have now solved multiple problems:
- No more tight coupling with the components imported and rendered. The demo components are now pluggable.
- The bundle is now broken down into chunks and gets loaded only when it is required. See the changed behavior below. Notice, the chunks are getting loaded(resource fetched) only when the respective buttons are clicked. Also a loading indicator with the
fallbackappears until the component loads.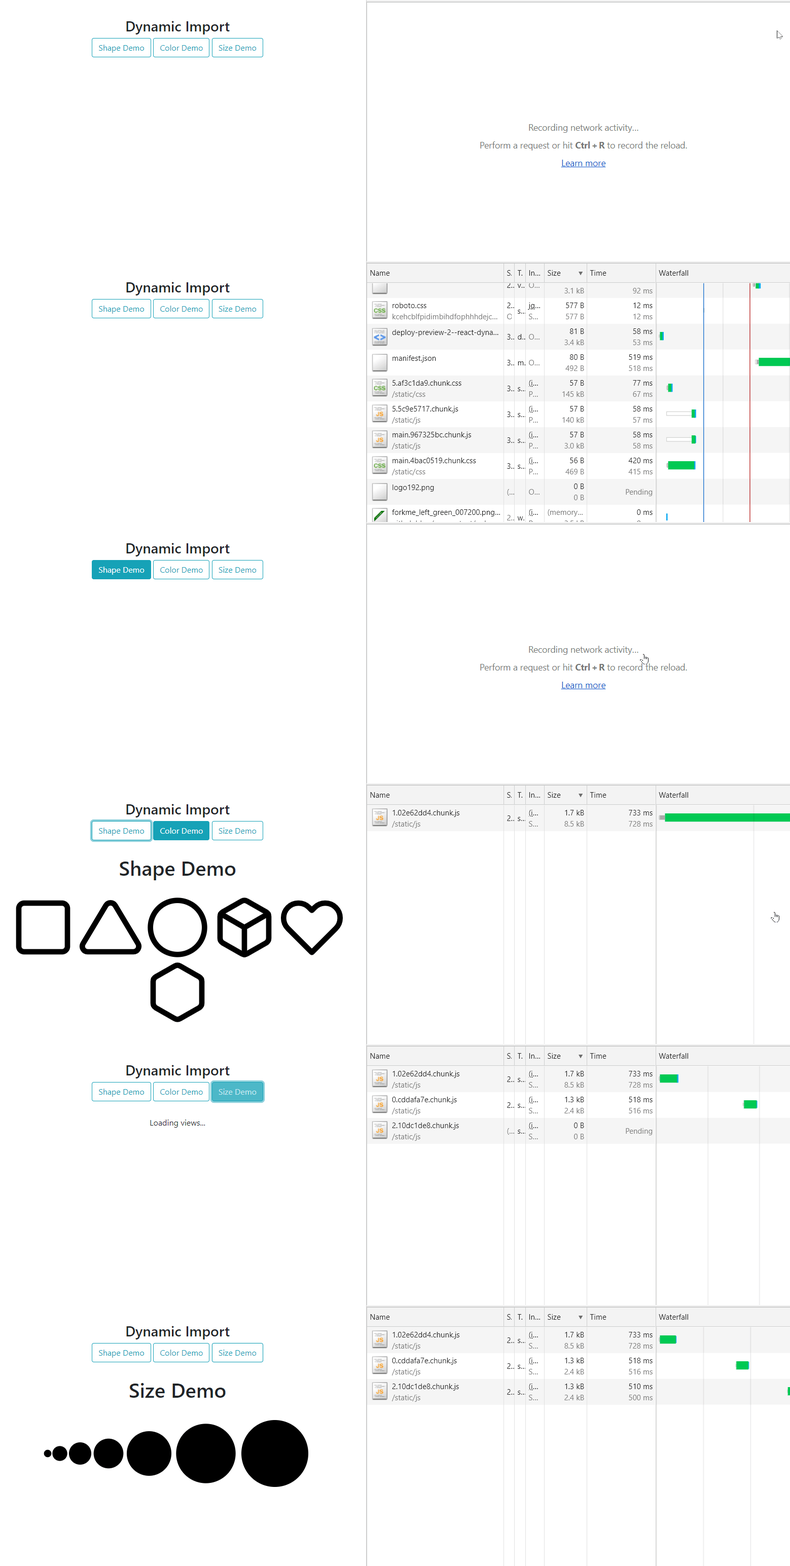
Learning ReactJS? Here is something for you:
Learn React, Practically
I've been developing professional apps using ReactJS for many years now. My learning says you need to understand ReactJS fundamentally, under the hood to use it practically.
With that vision, I have created a ReactJS PlayLIst that is available for the developer community for FREE. Take a look:
Conclusion
I admit, it was a long one. But if you have made it so far, it is a huge accomplishment for me as the author of this article. I just want to say,

If it was useful to you, please Like/Share so that, it reaches others as well. To get e-mail notification on my latest posts, please subscribe to my blog by hitting the Subscribe button at the top of the page. You can also follow me on twitter @tapasadhikary.
About the author
Co-Founder, @CreoWis | Teacher, @tapaScript | Founder, @ReactPlay | YouTuber | Writer | Human
Comments
Join the discussionHello Tapas Adhikary thanks for this amazing article,
but i want to ask what if we use lazy loading in all components will it have harmful effect?
Hey Tapas Adhikary, thanks for the great article. I think a small error prevented your example from working for me. You need to return the imported component in importDemo
const importDemo = file =>
  return lazy(() =>
    import(`./demo/${file}`)
      .catch(() => console.log('Error in importing'))
);
can anyone please explain this line to me? Thanks in advance. I am confused that's why.
Promise.all(promise).then(setSelectedDemo);
Hey Moinul Moin, Thanks for asking. Let me try explaining it.
When you have multiple unrelated asynchronous operations to perform, you should use the promise API method called all() or allSettled() to resolve them. You must not use the loop to resolve them one by one.
The method Promise.all executes multiple promises in parallel and returns a new promise. It waits for the execution of all the premises to complete. So, the execution time of the Promise.all method will be the same as the max time taken by an input promise.
In this example, we execute multiple promises using all() method and pass the output of execution to the setSelectedDemo method as an argument. The setSelectedDemo is a method to set the state selectedDemo.
What may be confusing to you is the selectedDemo method not taking any argument explicitly inside then(). You don't have to. Take this example,
You have three promises,
// It resolves with the value red after 1 second
const red = new Promise((resolve, reject) => {
    setTimeout(() => {
        resolve('red');
    }, 1000);
});

// It resolves with the value green after 3 seconds
const green = new Promise((resolve, reject) => {
    setTimeout(() => {
        resolve('green');
    }, 3000);
});

// It resolves with the value blue after 5 seconds
const blue = new Promise((resolve, reject) => {
    setTimeout(() => {
        resolve('blue');
    }, 5000);
});
Now you can use Promise.all() method
Promise.all([red, green, blue]).then(console.log);
Output,
['red', 'green', 'blue']
The Promise.all([red, green, blue]).then(console.log); is same as,
Promise.all([red, green, blue])
.then(function(colors){
    console.log(colors)
});
I hope it clarifies. If you are interested to know more about Promises, check this out,
Ah, there it is.
Been looking for the term opposite to lazy loading, eager loading.
Thanks!
Great, thanks Aditya Saxena for letting me know, it was helpful.
Hi, Do you have the final repo of this tutorial? And what gives Promise.all in the async function?
Loved it! So nicely explained. I wanted to do some tests with the new features like SupenseList and useTransition, although it is still unstable, cause' it seems super powerful. Have you tried it? Thanks for this, really, so helpfull.
Wow, Thanks Diana Hernández Soler! Appreciate.
features like SupenseList and useTransition
Yes, I have read through. Want to do some more hand-on and plan an article on it.
Really insightful article, will share this!
Loved it. Bookmarked it. Will re-read over the weekend :)
ReactJS
Find all my ReactJS articles under one roof. Don't forget to check out [ReactPlay](https://reactplay.io) for practising ReactJS concepts.


