JAMstack vs traditional monolithic workflow

Co-Founder, @CreoWis | Teacher, @tapaScript | Founder, @ReactPlay | YouTuber | Writer | Human
Welcome to the second article of the series, JAMstack for All. Thank you for your likes, comments, and feedback on the JAMstack Introduction article.
This article will be diving into the JAMstack workflow with a side-by-side comparison of the traditional, monolithic workflow. We will also understand that JAMstack and SPA(single-page application) are not the same.
I have introduced the phrase prebuilt markup to you in the introductory article. It is a compelling concept and promises lots to perform. Next, we will see how the pre-building will help us achieve a vital pillar or user experience, i.e., speed.
If you haven't read the previous article of the series yet, you can find it here, JAMstack for All: An Introduction. I would recommend you to read this for better clarity on the history, what, why part of the JAMstack story.
The ever-changing user experience and usage
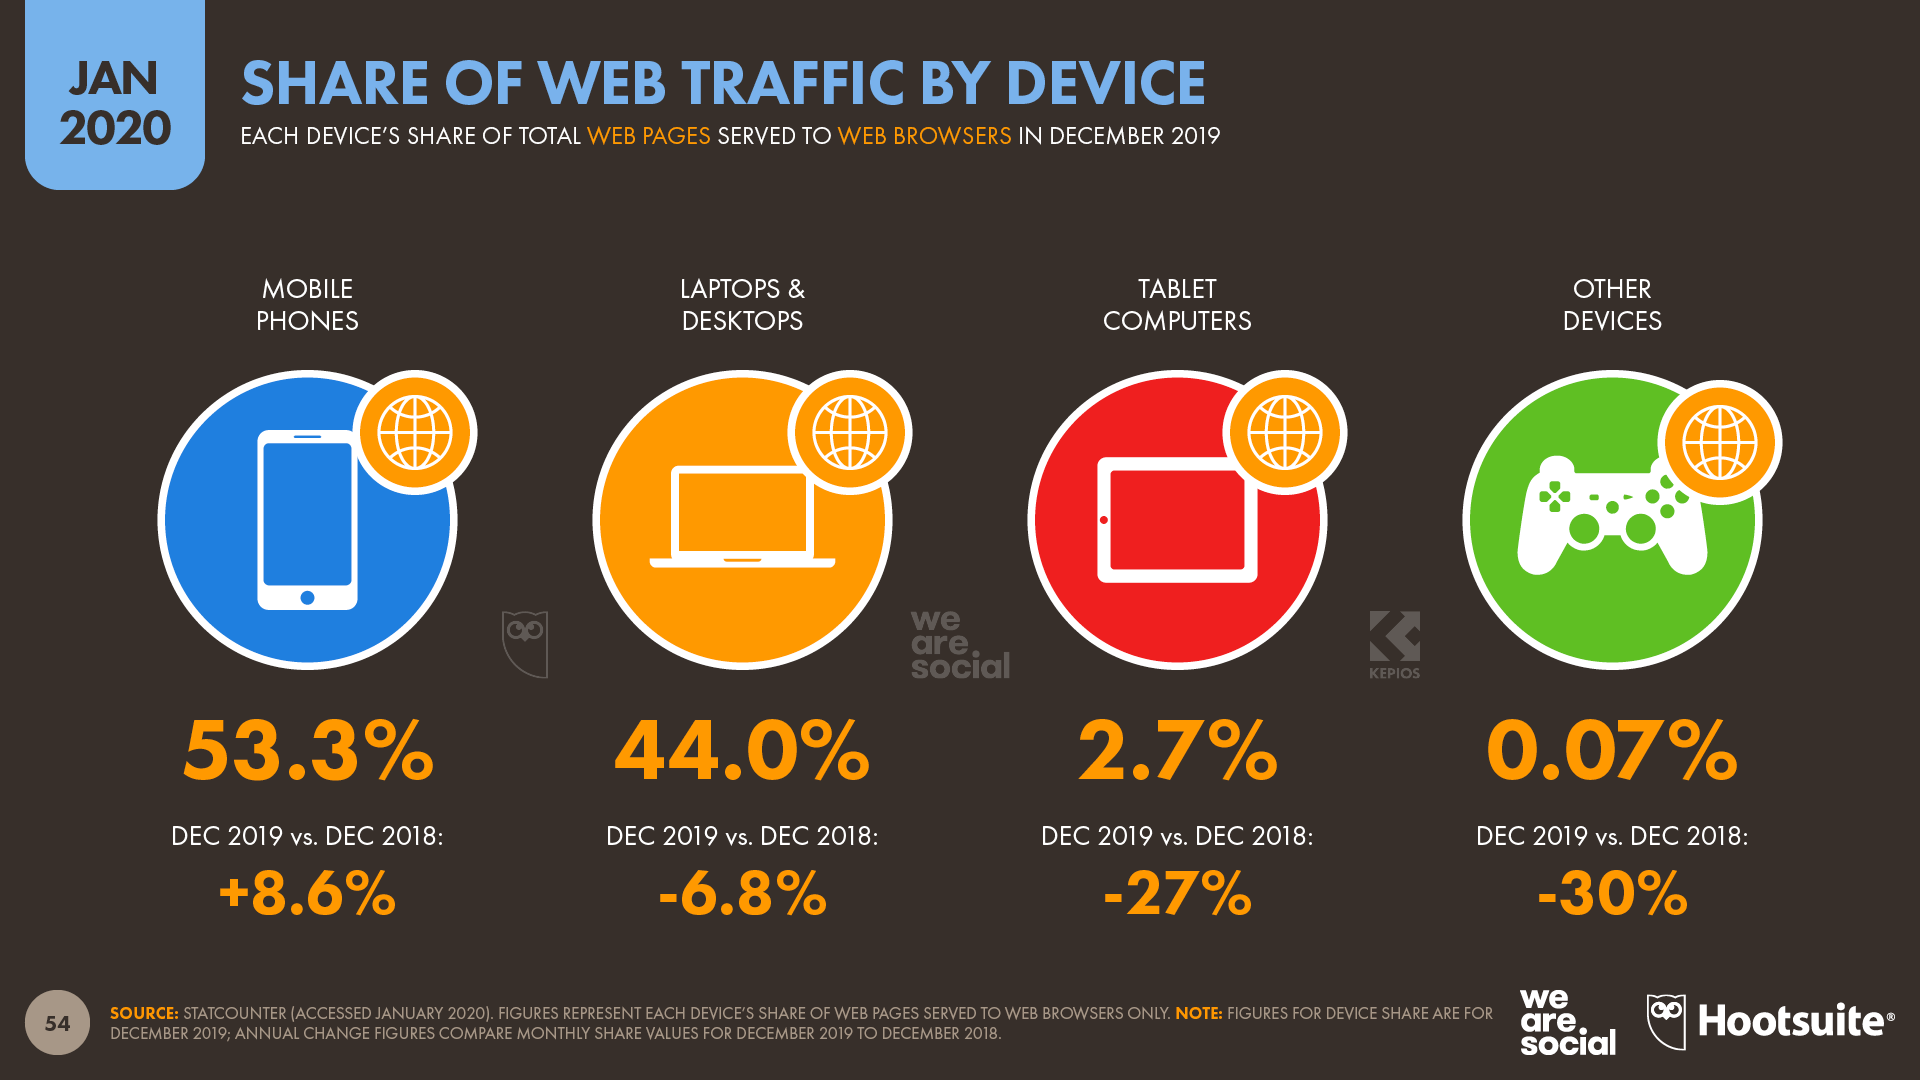
As per the report from wearesocial.com, roughly 53% of all web page requests come from mobile phones, and computers account for 44% of the total. It is a report of January 2020, and it shows that the mobile usage share is increasing steadily over the years.
Just like myself, many mobile users are impatient. They do not like to wait longer for a page load, hate an initial white screen or a loading indicator for long. However, depending on the economy, place of living, and earning, mobile and the computation power differ.
There are still many users out there with single-core mobile devices. On the other hand, there are users with high-end mobiles with excellent hardware support. However, speed is one of the everyday needs of both user classes. Do you know what? The users with high-end mobile devices are more impatient than others, as they are used to the fast environment.
As application developers, we need to count this important user expectation and design the experience accordingly. We need to make sure the page loads faster. We must get users the required initial bytes of page information as soon as possible to reduce a cold start.
Build ahead(prebuilt)
One of the characteristics of JAMstack is the markup should be prebuilt. It means we as developers can spend a few extra seconds in the build phase of an application than expecting a customer to get frustrated by burning those extra seconds at the run time. Our customers wouldn't care at all if we spend the extra time building the application.
A typical user mindset for an application load where lots are happening in the browser (screen-shot from Matt Biilmann's JAMstack at Scale: why pre-built markup is critical presentation):
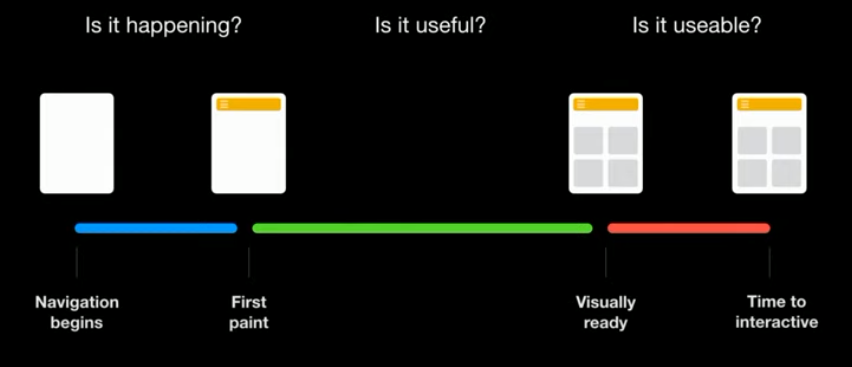
A significant amount of time goes into the initial load itself, and it leads your users to bounce off the application or website effortlessly. There is also a problem of not meeting user's expectations about the design. What if the users are not finding it helpful and have to roll back to the old state? Some production nightmares, isn't it?
With the prebuilt approach of JAMstack, we solve this to a great extent. All the required JavaScript and the markup and styles are already built and served from a content delivery network(CDN). Thus, there is no waiting at the browser's runtime about what script and which page to load.
The heavy lifting is done at once at the build time, which takes the processing time out of the request and eventually uses less computation at the run time.
The sections below show the difference in the build vs. load time between the server-rendered, SPA, and JAMstack applications.
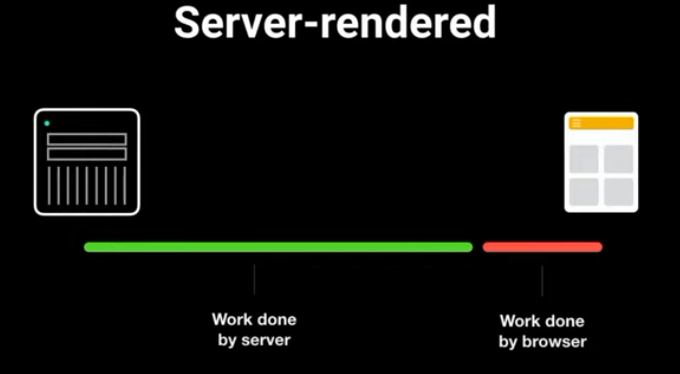
Server Rendered
In a server-rendered application, the server does all the heavy lifting. First, the browser needs to request a page, and the server computes, generates the page. Once done, it sends the page to the browser as part of the response. Finally, the browser downloads the page and renders it. This cycle repeats for each of the page loads, and all happen over the wires all the time.
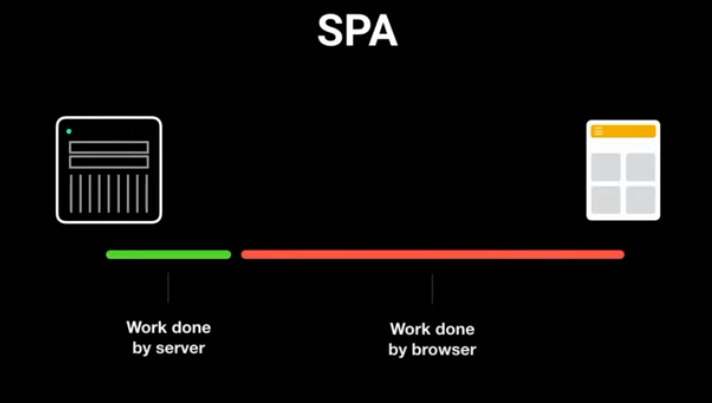
Single Page Application(SPA)
A single-page application solves the above problem greatly. The server doesn't handle the page computations, routing, and request-based serving. But the problem is, lots are happening on the client-side. So we rely on the browser and the device power for all the computations at the run time.
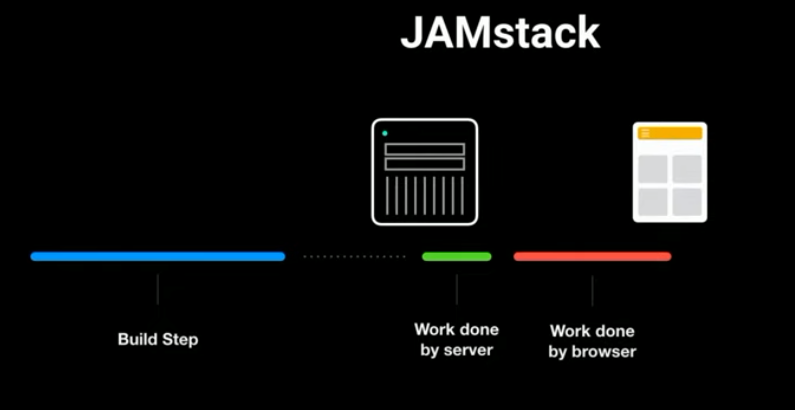
JAMstack
With JAMstack, the content is pre-built. As the JAMstack build process already built the content, there is no need for an origin server. Instead, we can serve the content from a CDN. It solves both the problems we have seen with the server rendered apps and SPA.
There are several advantages of pre-building the content,
- Transpile JavaScript and build with markup and style.
- Pull data from remote services.
- Build C into WebAssembly.
- Lint your code for accessibility (
Netlifyhas introduced the build time plug-in system, we will see it in the future article of the series). - Shaping up the data for the UI components at the build time.
How about the rollback issue we spoke about above? We will learn about it shortly.
CDN
As we know about the benefit of pre-building the app now, we need to talk a bit about CDN, i.e., content delivery network. There is not much advantage if a prebuilt markup when an origin server serves the content. It will be almost similar to the server-rendered applications.
Let us take an example. Assume that the origin server, abcd.com, serves the application content from some USA parts. A user like me who is from India wants to access a page from abcd.com. However, it may be a poor experience for me to render this page on my browser depending on my network speed, hardware capabilities, the distance between my browser and the origin server, etc.
How about I have the page(or the content) hosted in my proximity in a secured manner? This where the CDN comes in.
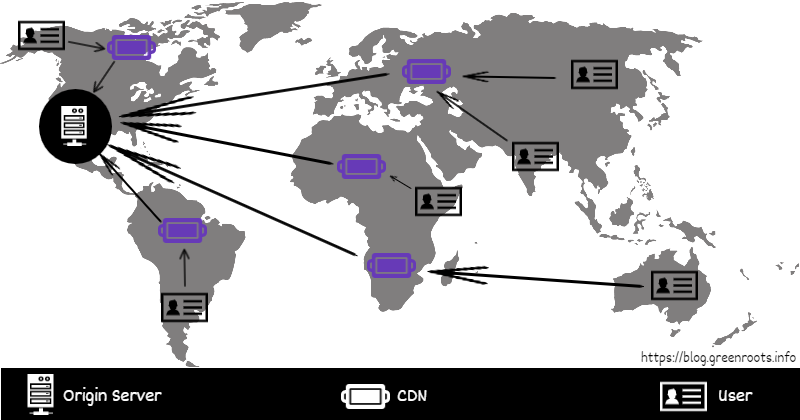
- CDN reduces the distance between the users and website resources.
- CDN reduces the amount of data transfer using minification techniques.
- Helps in cache invalidation so that users do not see the stale data.
- It is secured.
Traditional vs. JAMstack workflow
I am sure we have a good ground on the prebuilt content and CDN by now. So, with that, let us understand some critical differences between a traditional workflow and a JAMstack workflow.
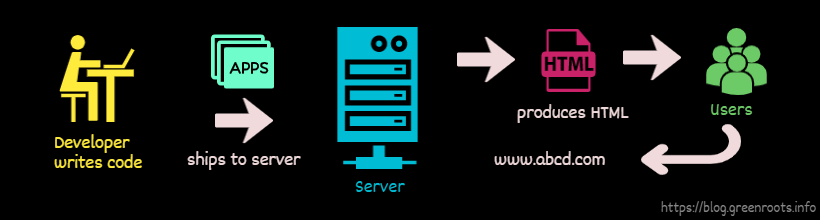
Traditional workflow
In a traditional client-server workflow,
- Developers write code, test, build the
application. - Ships the
applicationto a server(origin server). - Users request a resource from the
origin serverspecifying a URL. - The origin server does the computations, produces the
required HTML, and sends it to the user. When the user requests a new resource, the process continues.
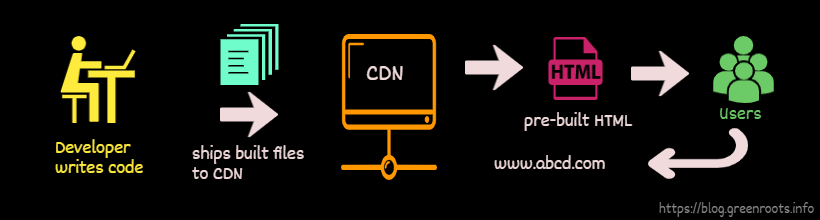
JAMstack workflow
In JAMstack workflow,
- Developers write code and push it to a
source repositorylike git. - A
workflowkicks off, which starts the build to createprebuilt content. - The prebuilt content then gets deployed to a
CDN. - Users request the resources from the
CDN(available in proximity), serving the prebuilt content. No need to reach out to the origin server.
It is also easy to manage customer expectations with JAMstack. However, reverting a fix or rolling back to a specific state of the application's traditional approach is challenging. It requires the process to plan a release, onboard developers, tester, DevOps. Then, build the entire application again, and then finally ship it to the server.
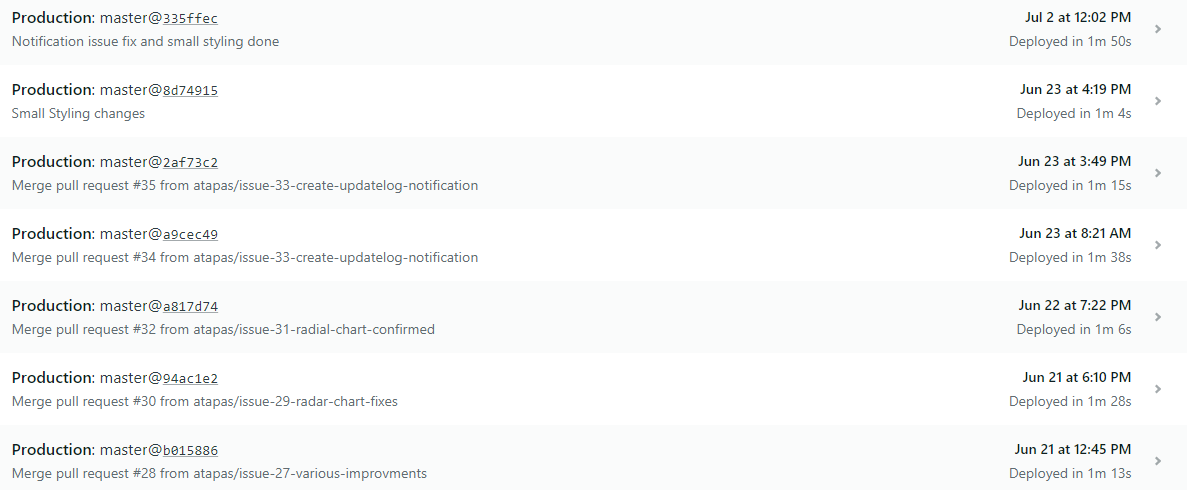
With JAMstack, the workflow is well-managed. Here is an example from Netlify where all my branch deploys are available to make an easy switch and serve the application from it with a single click. We will learn about this workflow in detail later in the series.
Further read
- Matt Biilmann - JAMstack at Scale: why pre-built markup is critical
- JAMstack best practices
- What is CDN
What's next
Great, so we know all about JAMstck and the fundamentals of it. I hope it was helpful to you. The following article will see Static Site Generators(SSG) usage and Headless CMS together.
We will go through the step-by-step way to build a JAMstack application using Gatsbyjs, tie it with the git workflow, and then deploy it with netlify. We will also learn to manage the content of our app using a CMS. It is going to be fun learning with all the concepts we have got so far. Stay tuned!
If it was helpful to you, please Like/Share so that it reaches others as well. Also, please subscribe to my blog by hitting the Subscribe button. Finally, you can follow me on Twitter @tapasadhikary.