Experience Sharing on Developing A Near-Realistic, Beautiful Mobile app in Record time using Flutter

Co-Founder, @CreoWis | Teacher, @tapaScript | Founder, @ReactPlay | YouTuber | Writer | Human
Background
My experience with mobile apps development is minimal. I had tried doing something basic with PhoneGap a while back and developed a few Hello World style applications using the Android SDK. But nothing with an incremental success to make it like a useful app.
I had built my own apprehensions about the complexity in setting up things, building, deploying, etc. This caused huge reluctance in me in trying out mobile app development (sigh) in the past.
Recently I learned about Flutter from Google. What caught my attention was,
Flutter - Beautiful native apps in record time
I felt this statement is so true. So here I present my experience in building a Near Realistic, (almost) Beautiful native app developed in around 9 hours(record time, not continuous though.)!
I will consider this as record time because I never had any experience working with,
- Dart as a Programming Language and its APIs. I had to learn, understand the useful APIs and code.
- Building anything that has to do with the Native app.
- Setup => Develop => Publish cycle of a Mobile App.
This post is all about sharing the joy of Developing a native app using Flutter. I am sure you will enjoy it as well if you are a beginner like me with it.
What's the App about?
I didn't want to build a Hello World again. I intended to learn the followings within a quick time by doing a good amount of hands-on:
- Know all about the Setup without getting demotivated.
- Write good code.
- Routing and Navigation, Complex?
- Layout and Design, Do I need to be a designer?
- Play with Images and Styles must be easy!
- Server Communication with API Call, Hmmm...
- Handling Custom Images/Icons
- Packaging and building
- Installation of the app
- Publishing it on Play Store, the fun begins.
I had enjoyed lots while developing a Prediction app using node-cli before. How about building a Prediction mobile app? Here is how the interaction goes:
Let us go Step by Step
Here is all that I could gather as my learning from it:
Setting up the environment
I have used Windows 10 operating system, and the aim was to develop, test the APP on an Android device. Instead, however, testing it on an IOS phone and without changing ane source code.
I just followed this to set up the environment: Flutter Install Doc. Follow it line by line. All will be set, guaranteed.
Note: if you are not using a Google Nexus phone, you may feel that you got to use an additional driver for your OS to connect to the phone using USB for debugging. You do not need to do anything additional.
Setting up the Editor to code and debug
I have configured VS Code as my editor for coding and debugging. Here is the link that I followed to set it up: Flutter VS Code setup
Flutter Doctor
Keep running the flutter doctor command to ensure you are on the right track.

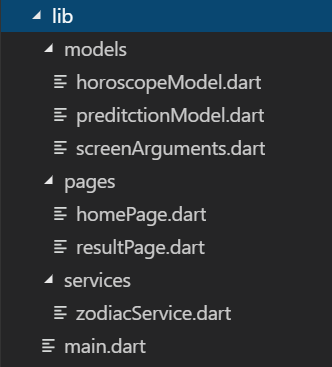
Code Structure
Dart is the language behind Flutter. In many of the examples out there, you will see one main.dart file contains tons of code. As the application grows, this file becomes unmanageable. To make sure I do not fall into this trap, and I had structured my code as below:
The main.dart file would look like:
import 'package:flutter/material.dart';

import 'pages/homePage.dart';
import 'pages/resultPage.dart';


void main() => runApp(new PredictionApp());

class PredictionApp extends StatelessWidget {
  @override
  Widget build(BuildContext context) {
    return new MaterialApp(
      title: 'Prediction',
      theme: new ThemeData(
        primarySwatch: Colors.red,
      ),
      home: new HomePage(title: 'Prediction'),
       routes: <String, WidgetBuilder> {
        '/home': (BuildContext context) => new HomePage(),
        '/result' : (BuildContext context) => new ResultPage()
      },
    );
  }
}
Routing
The Prediction app is a multi-page app. The Home Page asks for information from users. The Result Page fetches the information and shows that to the users. There is also an option to go back to the Home Page. Well, we need Routing.
These lines in the main.dart file do the trick:
routes: <String, WidgetBuilder> {
        '/home': (BuildContext context) => new HomePage(),
        '/result' : (BuildContext context) => new ResultPage()
}
Layout, Images, and Style
The Prediction app has multiple Widgets in use. Like, the title bar at the top, Body for the content, Form, which helps collect info from users, buttons, Images, Texts, etc. So following leanings are essential:
These links are super important and very informative, engaging to follow.
Server communication
Flutter uses a plug-in-based approach. We do not get everything installed by default with the framework itself. Rather, we need to install what we need and import it into the dart file to use it. The Prediction app needs to interact with the Horoscope-API that exposes HTTP methods to fetch data. The response format of the API calls is JSON.
To support this, I had added the following dependency in the pubspec.yaml file:
http: ^0.12.0+2
And in the main.dart file, imported it along with the JSON parser provided by Dart language itself.
import 'package:http/http.dart' as http;
import 'dart:convert';
These three lines Request the API, Receive JSON response and Parse it respectively:
final response = await http.get('http://horoscope-api.herokuapp.com/horoscope/' + predictionData.getDuration().toLowerCase() + '/' + zodiacSign);
final responseJson = json.decode(response.body);
Horoscope horoscope = new Horoscope.fromJson(responseJson);
The last line of the code parses the response JSON to map the value to the model(Horoscope) attributes.
The Horoscope model class is as simple as this:
class Horoscope {
  String horoscope;
  String sunsign;

  Horoscope({this.horoscope,this.sunsign});


  factory Horoscope.fromJson(Map<String, dynamic> parsedHoroscope){
      return Horoscope(
        horoscope: parsedHoroscope['horoscope'],
        sunsign : parsedHoroscope['sunsign']
      );
  }
}
Handling Custom Images
I have used many Custom Images(icons mostly) to represent various Zodiac Signs. So including the Custom Images and Icons are very easy.
- Create a folder called
assetsat the same level as thepubspec.yamlfile. - Keep all your icons and images inside the
assetsfolder. - Add the following entry into the
pubspec.yamlfile to include all the icons and images from the asset folder:
If you want to include selected icons/images, please specify the names respectively.assets: - assets/
Debugging, Packaging and Building
I had used both Android Emulator(Installed as part of the setup) and Real Device to debug the application. The Footer bar of the VS Code shows the devices you are connected to, and you can select one while debugging the code.

To Build the APK, use the following command:
flutter build apk
To install the APK on your device, connect the device with a USB and use the following command
flutter install -d DXXXXX0123456787
Where DXXXXX0123456787 is your Device Id.
TIPS on Deploying the APK
- Your app may use an internet connection like the Prediction app. Make sure to add the following line in the
android/app/src/main/AndroidManifest.xmlfile:<uses-permission android:name="android.permission.INTERNET" /> - You might want to customize the Launch Icon of your app, like
 Add the icon under folders named starts with
 mipmap-. These can be located underandroid\app\src\main\res. Then modify theAndroidManifest.xmlfile to point to the image/icon as
Please note, we can edit the same file to provide the suitable App name and description as well.android:icon="@mipmap/icon">
Publishing the app to the APP Store
If you have followed it so far, you have done 90% of it already. Please follow the links for doing the rest of it. Learn about the deployment.
That's All about it. It's effortless and super easyBut, above all, pure fun!
Code
Feel free to clone and enhance the code from GitHub
You can see the app in full action in the following video(30 seconds):
What's Next
Next, I would like to interact with Hardware like a Camera, Bluetooth and try out the ML Vision with Firebase. Stay Tuned!
Credit
- Cover icons made by Freepik from www.flaticon.com is licensed by CC 3.0 BY
I hope you liked the start. Please let me know what's your experience with mobile app development or with flutter. I will be glad to learn from your likes and dislikes of it. Let's connect. You can follow me on Twitter(@tapasadhikary).
Keep reading, Keep following, Keep sharing!